April 5, 2021
Hash Functions and MACs with SwiftCrypto
From SHA-2 internals to HMAC, a practical tour of cryptographic hashes and message authentication in Swift.
What is a Hash Function
Hash functions are a ubiquitous cryptographic primitive. They are simple in nature but today we’re going to explore them in more detail. Hash functions work by taking some data and outputting a unique string of bits, almost like an identifier for the data. The output is often called a digest or hash. If you pass the same data to the hash function multiple times, you will get the same hash back.
Cryptographic hash functions have a few more constraints than ordinary hash functions you may encounter when working with hash tables for example. These constraints are as follows:
- Pre-image resistance: This means that hash functions should be very difficult to reverse. Given the hash, it should be very difficult to reverse the hash function to obtain the original input data.
- Second pre-image resistance: Given an input and its associated hash, it should be impossible to find another input that yields the same hash.
- Collision resistance: It should be impossible to find two inputs that hash to the same output. Note that this is not the same as second pre-image resistance. With collision resistance, we are not given any inputs, it involves finding any two inputs that yield the same hash. Second pre-image resistance says that if we are given an input and its hash, we should therefore not be able to find another input that hashes to the same hash.
These properties allow us to use hash functions to provide proof of the integrity of our data. For example, if I send a message over the wire to another person and I want to make sure the message doesn’t get tampered with in flight, I can also provide a hash of the message. The receiver can verify the message wasn’t tampered with by hashing the message they received and comparing it with the hash I sent along with the message. If the hashes are equal, cool, the message hasn’t been tampered with. Otherwise, the receiver knows someone has messed with the message and should ignore it.
Note that this isn’t foolproof. While we can be sure that my original message hasn’t been modified, someone tampering with our communications can instead replace my message with their own, calculate a new hash for that new message and send that along to the receiver pretending to be me. Since the receiver will calculate the hash and verify it matches the hash that was provided, they have no reason to doubt the integrity of the message. To solve this, we need authentication but that will be discussed at the end of this article when we get to Message Authentication Codes. For now, let’s focus on hash functions.
SHA-2 Hash Function in Swift
Before diving into the internals, let’s look at how we can use hash functions in Swift with the Swift-Crypto library.
import Crypto
import Foundation

// SHA-256 is a standardized hash function that returns a 256-bit hash
var sha256 = SHA256()

// Transforms into bytes
let dataToHash = "Hello, Swift!".data(using: .utf8)!

// `update()` accepts input into the hash function.
// Can be called multiple times with more data and it will iteratively modify the internal state
// of the hash function
sha256.update(data: dataToHash)

// Returns the output of the hash function
let sha256Digest = sha256.finalize()

print(String(describing: sha256Digest))
This outputs:
> SHA256 digest: bbf2daf7fc3beff9c3162fc4a1c1cd5d8d95e9405cfe967d16e0646c8f32cad9How SHA-2 Works
The SHA-2 family of hash functions (includes SHA-256, SHA-384, SHA-512) is a Merkle–Damgård construction which is an algorithm that produces a hash of an input by calling a compression function many times. There are two steps involves in the Merkle–Damgård construction:
- Apply padding to the input and split input into blocks. Hash functions have a block size which specifies the size of the input it can receive. For example, SHA-256 has a block size of 512 bits. Padding the input is done to ensure the input of the hash function is a multiple of the block size.
In the below example, we are going to split the input into blocks of 8 bytes. The first two blocks are fine, but the third block is only 4 bytes long, so we need to add an additional 4 bytes of padding to turn it into a multiple of 8 bytes.
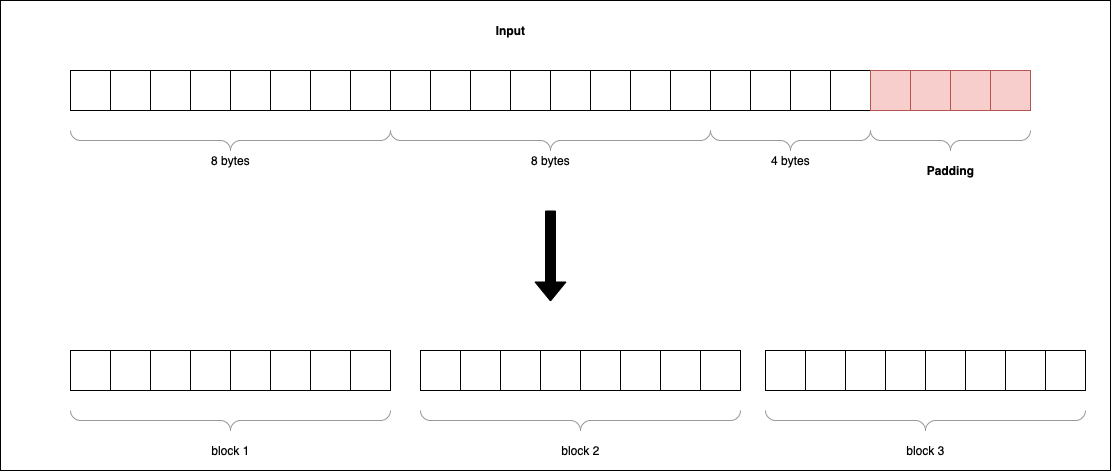
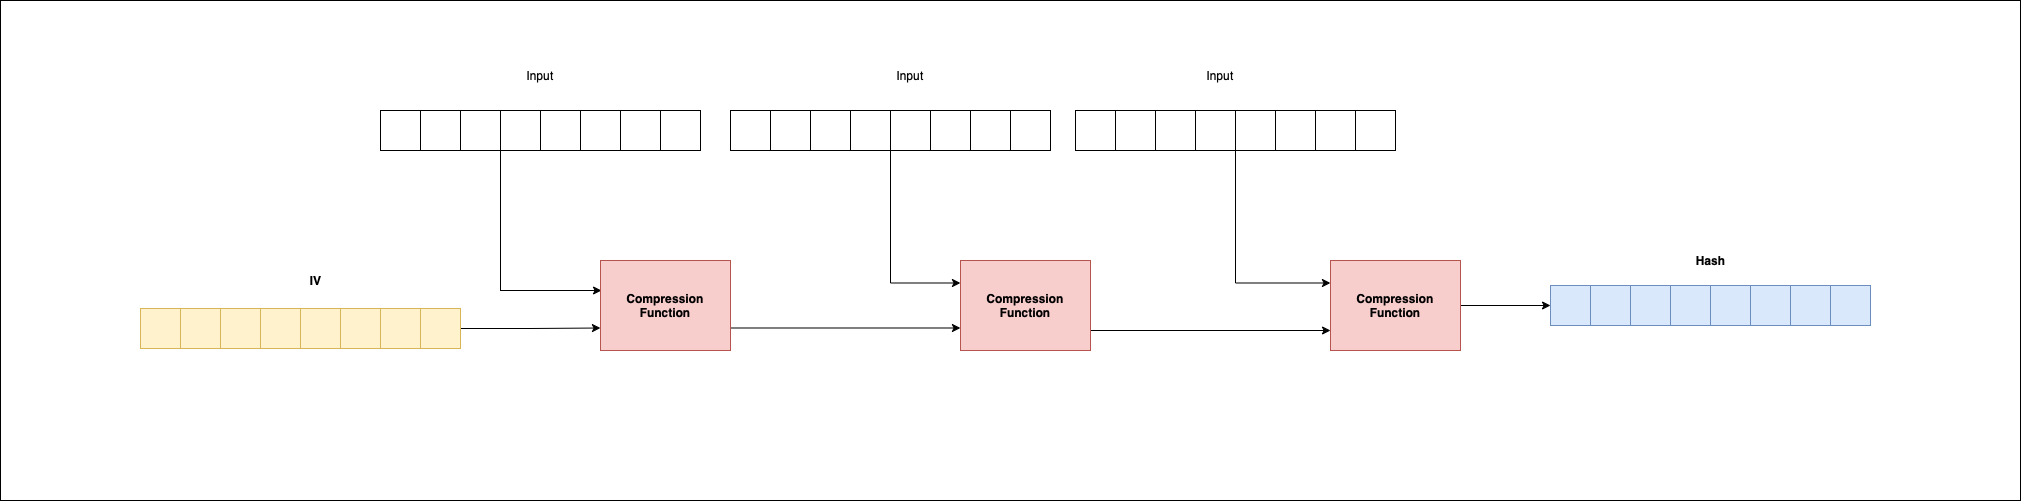
- Apply the compression function iteratively on the input blocks. The compression function accepts two inputs. When first called, the first block of the input is passed in along with an IV or an initialization vector which is just an initial parameter. The output of the first call to the compression function is passed as input to the second compression function along with the second block of the input. The process repeats until there are no more input blocks. The final output is the hash or digest.
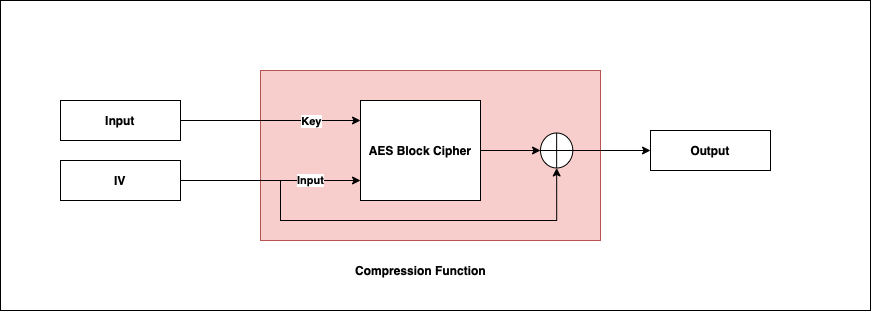
Since AES is a cipher, it accepts a key and the input to encrypt. For the SHA-2 hash function, the input message block is used as the key to the cipher and the IV is used as the input. Finally, the output of the block cipher is XOR’d with the IV and this is the output of the compression function.
Under the hood, the compression function makes use of the AES block cipher for the SHA-2 family of hash functions. I’ll discuss AES and block ciphers in another post but essentially it is an encryption algorithm. For now, you can think of AES as jumbling the bytes of the input around so that the output appears random.
Message Authentication Codes (MACs)
I mentioned at the beginning of this article why we need authentication since hash functions alone cannot guarantee that the person I have sent the message to received what I initially sent them. MACs provide integrity (data hasn’t been tampered with) and authenticity (message is actually from me and not some other person) through the use of a symmetric key. A symmetric key just means the key is shared by the two communication parties.
MACs generate an authentication tag which is similar to a hash so the receiver can confirm the integrity and authenticity of the data they received by passing the data through to the MAC along with our shared key. If the data has been tampered with, the MAC algorithm will return an error.
HMAC
The standard MAC algorithm is the HMAC algorithm which makes use of the SHA-2 family of functions, typically SHA-256. It works as follows:
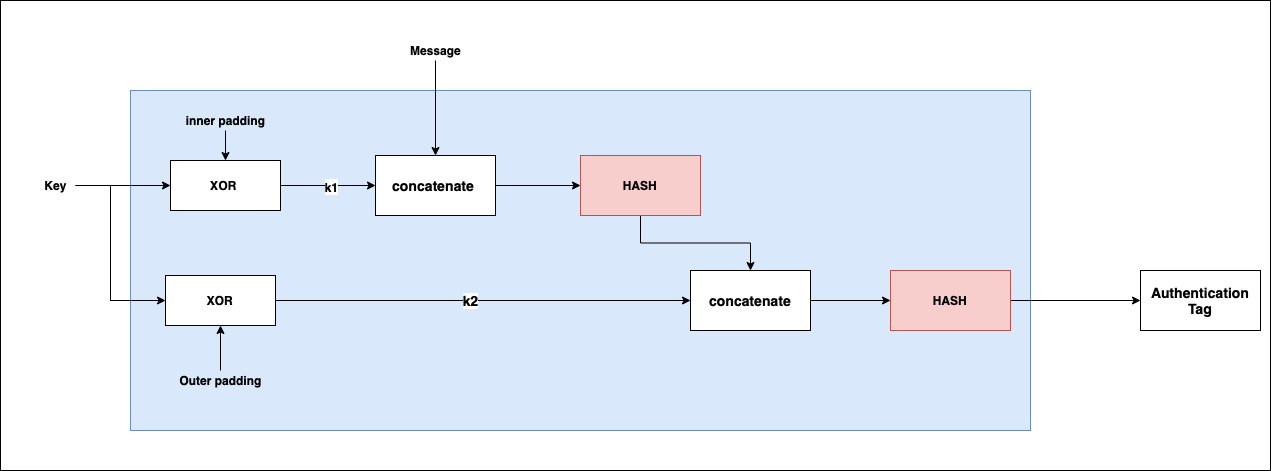
- Two constants are defined,
innerPaddingandouterPadding. Sometimes calledipadandopad - The symmetric key is first XOR’d with the
innerPaddingto generatek1 - The symmetric key is also XOR’d with the
outerPaddingto generatek2 k1is concatenated with the input message and passed into the first hash functionk2is concatenated with the output of the first hash function from step 4. The result is passed to the second hash function- The output of the second hash function is the authentication tag
HMAC Implementation in Swift
import Crypto
import Foundation

// Shared secret key that will be used by both sender and receiver
let key = SymmetricKey(size: .bits128)
var mac = HMAC<SHA256>(key: key)

let dataToHash = "Hello, Swift!".data(using: .utf8)!
mac.update(data: dataToHash)
let digest = mac.finalize()

print(String(describing: digest))
Outputs:
> HMAC with SHA256: bd21b83d3c725af4435236b6d1d7483d6e31b7c8e2e06fd5ac06e4b2366e81e1